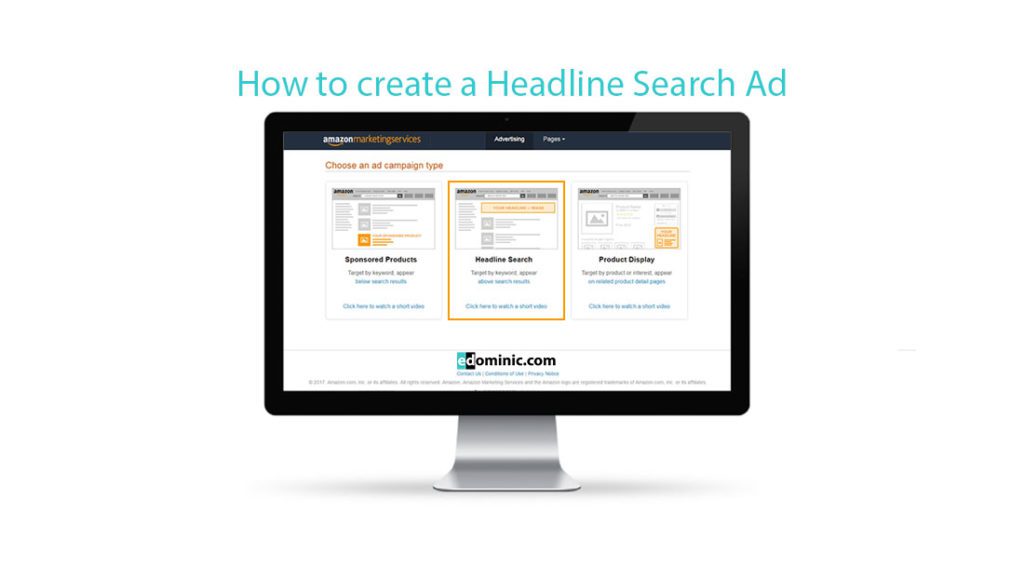
In this article we will look at the five steps involved in creating a Headline Search Ad (now called Sponsored Brands). Keep in mind that you cannot jump over these steps, so you’ll need to do everything in order. The system won’t show you the next step unless you have completed the previous one.
Step 1 – Add a landing page
1.1. Create a page
The first step is creating a landing page with your products – you won’t be able to change this after launching the campaign, so put some thought into selecting the products that you wish to advertise.
You can create this in 3 different ways:
1.You can search for the products and add minimum 3 of them directly in the AMS search box (it is a requirement to select at least 3 products for a HSA).
2.You can add a series of ASINs directly in the search box using the following structure: ASIN|ASIN|ASIN|ASIN – there’s no space between the ASINs and “|”. See below how the landing page will look like by using these first 2 methods.
3.You can also create a landing page by searching for the ASINs directly on Amazon (use the same structure as previously: ASIN|ASIN|ASIN) – just enter them in the Amazon search box. See below how the landing page will look like if you are using this method.
Important to Know: The advantage of the first 2 methods compared to the 3rd one, is that the page that you are creating shows only your products – no side menus, no ads. As you can see in the image above, when you are creating a landing page using the third solution, the page also contains the regular side menu. It can also contain ads on the left side (these are most likely AMG ads).
The disadvantage of the first 2 methods, is that if Amazon deems your ASIN(s) ineligible, then you won’t be able to add it/them to the page. If you are using the third method, your ineligible ASINs will not appear on the page either, but you can add them to the page and once they become eligible, they will be displayed.
I prefer using the first 2 solutions as long as all the ASINs are in stock and eligible – this will ensure that no other ads (competitors’ ads potentially) appear on the landing page. If you have ineligible products, the third solution might work better for you.
1.2. Your Amazon Page
AMS allows you to create a landing page using the tool from the top menu called “Pages”. If you already have a landing page created using this tool, then you only need to click on “Your Amazon Page” and Amazon will use this landing with your campaign. If you haven’t created a page already, you can do so now.
Since July 2017, Amazon has also launched a new tool called “Stores”. This allows you to create a general brand store and different landing pages for your products.
1.3. Custom URL
You have 2 ways of doing this:
1. You can search for the ASINs (same structure as previously: ASIN|ASIN|ASIN) directly on Amazon – just enter them in the search box>copy the URL and then add it to your AMS campaign.
The advantage of this solution is that you can add any ASINs (even ineligible ones) – once your products will become eligible, they will automatically appear on the page that you created. The disadvantage is that you might get other ads on your page (usually, they belong to other brands and they might grab your customers away – these are usually booked through the Amazon Marketing Group).
2. If you have already created another landing page on Amazon with retail or with the Amazon Marketing Group, you will be able to add its URL here and use that page with AMS.
Extremely important to remember before creating a page, is that you need at least 3 ASINs on the page in order for it to be approved to use with AMS campaigns.
Step 2 – Choose your campaign settings
Enter Campaign Name – keep in mind that you cannot change this once the campaign has been launched, so make it easily recognisible.
Enter budget – with HS, you can either set a daily budget or an overall campaign budget.
If you set a daily budget, you can then proceed to selecting the date range of the campaign. See the below image.
If you go with a campaign budget, you can also decide on the start and the end date of the campaigns, but you are also given another feature: set the campaign to deliver as quickly as possible or set the campaign to deliver evenly (there are advantages and disadvantages of each one of these features). See the below image.
Step 3- Add keywords and bids
With HS campaigns you can only use manual targeting. SP and PD ads allow you to use automatic targeting as well.
Upload a spreadsheet with keywords – unfortunately, at the moment this feature isn’t working properly, so you might need to try it a couple of times.
Add your own keywords – use this to add the variations of the search terms that you believe that your target will be using. Add one keyword/search query per line – no other punctuation signs needed.
Set the Match type. For HS campaigns, you have to possibility to set the keywords only as “Phrase” and “Exact” match. This is limited compared to the match ranges that you can set with SP ads: “Broad” match, “Phrase” match, “Exact” match, “Negative Phrase” and “Negative Exact”).
Set your bid for each keyword and click “Add”. If you add multiple keywords at the same time, the Match and the bid will be the same for all of those keywords.
Step 4 – Create your ad
Set your Brand name – this will show on your ad as “Sponsored by…”
Enter a compelling Headline. For this type of ads, the maximum number of characters that you can use is 50. Make sure that your title follows Amazon’s guidelines, otherwise your ad will be rejected.
Add a Featured Image – product images usually work best.
Add up to 3 featured products – you also have the possibility to add less or none. I recommend adding 3 of them as users will be taken directly to the product pages if they click on them. This way, you are minimising the amount of clicks that it takes for the user to get to the product. You may also decide not to add these products for various reasons. For example, if you are using a landing page that you created and you have more information there about the products, you may want for the users to land on the page and not go directly to the product page. All of these depends on your objectives.
Once you have launched the campaign, you cannot change or amend the above (not even the ad copy), so I recommend you consider them carefully.
Step 5 – Save as draft or Submit campaign
If you have completed all the above steps, you will notice that “Save as draft” and “Submit campaign” are both clickable.
I recommend you verify the campaign before launching it, as after it starts running, there are very little changes that you can make to it. Also, keep in mind that HS ads are firstly manually reviewed by an Amazon team, so they might be rejected if you haven’t followed their guidelines.
Important to know: if after you save a campaign as a draft and returning to it you cannot see the data anymore, it means that your ASINs have been removed for some reason (i.e. becoming ineligible, or out of stock, or removed by Amazon from the site, etc.). Add them back (or other ones) and you’ll be able to see all the other settings again: the name of the campaign, the settings, etc.
Read also:
Pingback: How to create Sponsored Products Ads (SPA) on AMS - AmazonPPC
Pingback: The optimal number of products to promote in an AMS campaign - AmazonPPC
Pingback: Top 10 tips to prepare your AMS campaigns for Q4 and the winter sales - AmazonPPC
Pingback: A new look for Headline Search Ads on AMS - AmazonPPC
Pingback: How to optimise your AMS campaigns for the Easter Sale Season - AmazonPPC
Pingback: Run campaign as quickly as possible or spread campaign evenly – which feature to choose in AMS campaigns - AmazonPPC
Pingback: How to create Product Display Ads (PDA) on AMS | Amazonppc
Pingback: What is/was run campaign as quickly as possible? | Amazonppc
Enjoyed reading through this, very good stuff, thanks.
So prepared to devote some hard work tolearn more about AMS. Thanks for sharing
Best of luck, Richie. Amazon Advertising is becoming bigger and bigger every single quarter, so you’re in the right business. Let me know if I can help any further with your campaigns.
Plenty of resource materials here. Thank you!
Happy that you find these useful, Matilda.
Pingback: How to optimise your AMS campaigns for the Easter Sale Season - eDominic